Welcome to this tutorial on making a shadow matte with V-Ray. To complete this tutorial you will need 3DS Max 2008 or newer, with V-Ray 1.5 and Adobe Photoshop.
The purpose of this tutorial is to show you how to render out a 3D object, with its shadow included in an alpha channel, so that you can composite the 3D object and it's shadow on top of an existing photograph.
You will need to download the "vray shadow matte tutorial.rar" file from: http://www.turbosquid.com/FullPreview/Index.cfm/ID/473854
In this file you will find two 3ds max files, a background photo and some additional info.
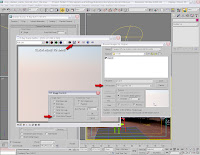
Please note that the max file used in this tutorial uses the V-Ray LWF (Linear Work Flow) technique, as described on the chaosgroup forums (www.chaosgroup.com). To use LWF you need to change 3DS Max's Gamma settings - please see the included file called "LWF_gamma_settings.jpg" to see what your settings should be. (You can change the Gamma settings in 3DS Max under: Customize >Preferences.) You also need to change the color mapping in your Vray settings, there are various options for this, I've shown one in the included file "LWF_VRay_Color_Mapping_settings.jpg"
lukx (http://www.lukx.com/) has made a simple video tutorial on LWF, it can be found here: http://rapidshare.com/files/16248248/LWFbyLukx.avi.html
Aversis also has a brilliant tutorial about LWF on his website:
http://www.aversis.be/tutorials/vray/essential_gamma_01.htm
There is also a tutorial on LWF on my blog: http://jg3d.blogspot.com/2008/12/v-ray-lwf-easy-way-for-3d-studio-max.html
Lets start:
Step 1
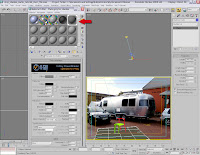
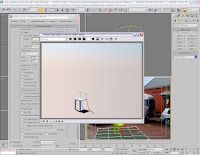
Open the file: "vray_shadow_matte_tutorial_start_file.max"
You should see something like this:
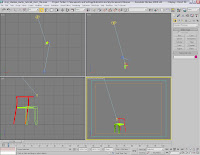
Step 2
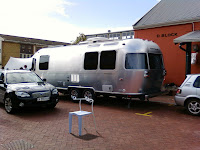
We need to load the background photo ("background.jpg") into 3ds max, so that we can match the perspective of the VRayPhysicalCamera01 to the perspective of the background photo. We also need to match the shadows created by VRaySun01 with those in the photograph.
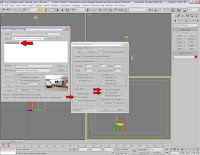
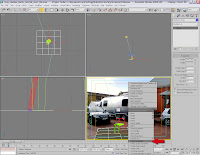
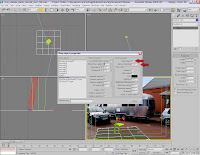
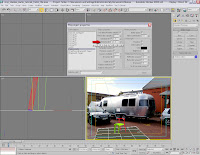
Go to the 3ds max menu bar and chose View>Viewport Background...
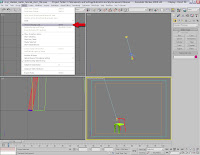
Now load the background photo ("background.jpg") as shown in the screenshot below. Remember to select Match bitmap, Display Background and Lock Zoom/Pan, so that the background stays the correct size in the viewport.
Step 3
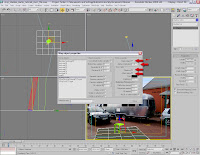
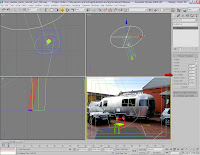
Your 3ds max viewports should look like this now:
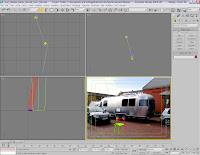
At this point you could move the Camera and the Sun to make the chair look as though it is sitting correctly on the paving. I've done the basic setup for you already - you can always fine-tune it later if you want to.
Step 4
Create a Plane object under the chair. This is going to be our shadow matte object, so rename it to "shadow matte". It needs to be approximately 2400 mm x 2400mm big.

Step 5
Now assign a plain grey VRayMtl to the "shadow matte" plane. I have made a material for you already, it's in the top right corner of the material editor.
Step 6
Right-click the "shadow matte" object and go into the V-Ray properties of the object:
Select the Matte object checkbox, and change alpha contribution to -1.
Alpha contribution=1 is solid, with no transparency, 0 is transparent by itself, but still shows anything behind it, and -1 is transparent blocking everything behind:
Now to include shadows and their effect in the Alpha channel, you must enable Shadows and Affect Alpha:
Next we need to turn off "Receive GI" in the VRay object properties, so that the shadow's colour is not affected by the light from the VRaySky and VRaySun. (Otherwise it would be blueish in colour):
Step 7
Change the size of the VRaySun01 size to 13 (this will make the shadows a bit softer).
Step 8
Click Render and render the scene:
Step 9
Now save the image as a tiff or tga file with an alpha channel:
Step 10
All we need to do now is open the image we rendered out and the background photo in Photoshop and comp them together. (Easy if you've done before, not so easy if you haven't :p )
Select the chair and shadow via the alpha channel:
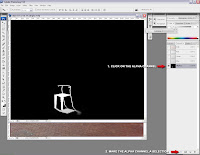
Make the RGB channels active:
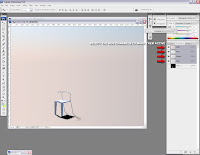
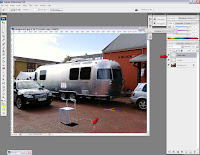
Copy the chair and shadow selection to the clipboard (CTRL+C) and paste(CTRL+V) the chair on to the "backround.jpg" image, and place it where you think it fits best...but there is a problem with the shadows:
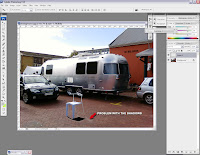
Don't worry, we can fix this by duplicating the chair layer, and making the bottom layer (the shadow) use linear burn as a blending mode.
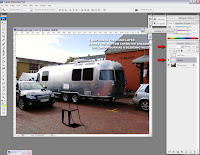
Now switch the top chair layer back on (make it visible). We also have to delete the shadow area from the top chair layer:
Just a bit more Photoshopping....
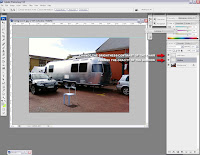
You're done!
Please note that this might not be the most accurate or beautiful rendering and comp, but I just wanted to show you the basic principal behind using a VRay shadow matte - it's a handy technique to know!
JG3D has moved and is now at http://www.jg3d.net/
The purpose of this tutorial is to show you how to render out a 3D object, with its shadow included in an alpha channel, so that you can composite the 3D object and it's shadow on top of an existing photograph.
You will need to download the "vray shadow matte tutorial.rar" file from: http://www.turbosquid.com/FullPreview/Index.cfm/ID/473854
In this file you will find two 3ds max files, a background photo and some additional info.
Please note that the max file used in this tutorial uses the V-Ray LWF (Linear Work Flow) technique, as described on the chaosgroup forums (www.chaosgroup.com). To use LWF you need to change 3DS Max's Gamma settings - please see the included file called "LWF_gamma_settings.jpg" to see what your settings should be. (You can change the Gamma settings in 3DS Max under: Customize >Preferences.) You also need to change the color mapping in your Vray settings, there are various options for this, I've shown one in the included file "LWF_VRay_Color_Mapping_settings.jpg"
lukx (http://www.lukx.com/) has made a simple video tutorial on LWF, it can be found here: http://rapidshare.com/files/16248248/LWFbyLukx.avi.html
Aversis also has a brilliant tutorial about LWF on his website:
http://www.aversis.be/tutorials/vray/essential_gamma_01.htm
There is also a tutorial on LWF on my blog: http://jg3d.blogspot.com/2008/12/v-ray-lwf-easy-way-for-3d-studio-max.html
Lets start:
Step 1
Open the file: "vray_shadow_matte_tutorial_start_file.max"
You should see something like this:

Step 2
We need to load the background photo ("background.jpg") into 3ds max, so that we can match the perspective of the VRayPhysicalCamera01 to the perspective of the background photo. We also need to match the shadows created by VRaySun01 with those in the photograph.
Go to the 3ds max menu bar and chose View>Viewport Background...

Now load the background photo ("background.jpg") as shown in the screenshot below. Remember to select Match bitmap, Display Background and Lock Zoom/Pan, so that the background stays the correct size in the viewport.

Step 3
Your 3ds max viewports should look like this now:

At this point you could move the Camera and the Sun to make the chair look as though it is sitting correctly on the paving. I've done the basic setup for you already - you can always fine-tune it later if you want to.
Step 4
Create a Plane object under the chair. This is going to be our shadow matte object, so rename it to "shadow matte". It needs to be approximately 2400 mm x 2400mm big.

Step 5
Now assign a plain grey VRayMtl to the "shadow matte" plane. I have made a material for you already, it's in the top right corner of the material editor.

Step 6
Right-click the "shadow matte" object and go into the V-Ray properties of the object:

Select the Matte object checkbox, and change alpha contribution to -1.
Alpha contribution=1 is solid, with no transparency, 0 is transparent by itself, but still shows anything behind it, and -1 is transparent blocking everything behind:

Now to include shadows and their effect in the Alpha channel, you must enable Shadows and Affect Alpha:

Next we need to turn off "Receive GI" in the VRay object properties, so that the shadow's colour is not affected by the light from the VRaySky and VRaySun. (Otherwise it would be blueish in colour):

Step 7
Change the size of the VRaySun01 size to 13 (this will make the shadows a bit softer).

Step 8
Click Render and render the scene:

Step 9
Now save the image as a tiff or tga file with an alpha channel:

Step 10
All we need to do now is open the image we rendered out and the background photo in Photoshop and comp them together. (Easy if you've done before, not so easy if you haven't :p )
Select the chair and shadow via the alpha channel:

Make the RGB channels active:

Copy the chair and shadow selection to the clipboard (CTRL+C) and paste(CTRL+V) the chair on to the "backround.jpg" image, and place it where you think it fits best...but there is a problem with the shadows:

Don't worry, we can fix this by duplicating the chair layer, and making the bottom layer (the shadow) use linear burn as a blending mode.

Now switch the top chair layer back on (make it visible). We also have to delete the shadow area from the top chair layer:

Just a bit more Photoshopping....

You're done!

Please note that this might not be the most accurate or beautiful rendering and comp, but I just wanted to show you the basic principal behind using a VRay shadow matte - it's a handy technique to know!
JG3D has moved and is now at http://www.jg3d.net/