I've seen a lot of activity from V-Ray users on the web wanting to know how to use the LWF (Linear Work Flow) method for V-Ray. If you do a search on the official V-Ray forums (http://www.chaosgroup.com/forums/vbulletin/) for LWF, you will come across many, many pages of info. Too many pages. Wading through this info is tedious and time consuming, and it's filled with lots of theory, so I've decided to summarize the work flow in the shortest possible way, without any technical mumbo jumbo. BTW, what is this LWF thing anyway? Well it's simply an easier way to ensure quick, consistent and accurate lighting of 3D scenes. (No more burnt out images!) It's particularly useful for 3D architectural renderings. Just try it - it works!
Step1:
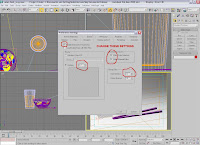
Change 3DS Max's Gamma settings to 2.2 (You can change the Gamma settings in 3DS Max here: Toolbar>Customize>Preferences)
Step2:
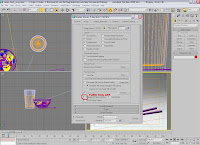
Change the color mapping in your V-Ray settings (Toolbar>Rendering>Render>V-Ray>V-Ray::Color Mapping)

Step3:
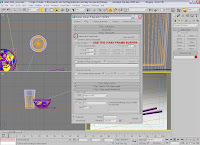
Disable the standard 3DS Max virtual frame buffer (VFB) (Toolbar>Rendering>Render>uncheck the "Rendered Frame
Window" check box.
Step4:
Enable the V-Ray frame buffer (VFB) (Toolbar>Rendering>Render>V-Ray>V-Ray Frame buffer>check the "enable V-Ray Frame Buffer" check box. (I recommend using the V-Ray frame buffer all the time anyway, as it gives you more options for adjusting your renders - exposure, color correction, etc.)
That's it - your done! You are are now ready to create beautiful, well lit renderings!
V-Ray genius Aversis also has a brilliant tutorial about LWF on his website, that explains things in a bit more detail:
http://www.aversis.be/tutorials/vray/essential_gamma_01.htm
3D guru lukx (http://www.lukx.com/) has also made a simple video tutorial on LWF, it can be found here:
http://rapidshare.com/files/16248248/LWFbyLukx.avi.html

JG3D has moved and is now at http://www.jg3d.net/
Step1:
Change 3DS Max's Gamma settings to 2.2 (You can change the Gamma settings in 3DS Max here: Toolbar>Customize>Preferences)

Step2:
Change the color mapping in your V-Ray settings (Toolbar>Rendering>Render>V-Ray>V-Ray::Color Mapping)

Step3:
Disable the standard 3DS Max virtual frame buffer (VFB) (Toolbar>Rendering>Render>uncheck the "Rendered Frame
Window" check box.

Step4:
Enable the V-Ray frame buffer (VFB) (Toolbar>Rendering>Render>V-Ray>V-Ray Frame buffer>check the "enable V-Ray Frame Buffer" check box. (I recommend using the V-Ray frame buffer all the time anyway, as it gives you more options for adjusting your renders - exposure, color correction, etc.)

That's it - your done! You are are now ready to create beautiful, well lit renderings!
V-Ray genius Aversis also has a brilliant tutorial about LWF on his website, that explains things in a bit more detail:
http://www.aversis.be/tutorials/vray/essential_gamma_01.htm
3D guru lukx (http://www.lukx.com/) has also made a simple video tutorial on LWF, it can be found here:
http://rapidshare.com/files/16248248/LWFbyLukx.avi.html
JG3D has moved and is now at http://www.jg3d.net/