Welcome to this tutorial on rendering moving objects with V-Ray. To complete this tutorial you will need 3DS Max with V-Ray 1.5 SP2 or newer, and a little patience!
When rendering animations with V-Ray, there are two basic approaches:
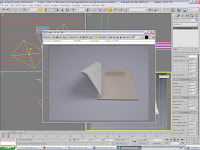
1. Rendering an animation where something is moving, like a car, a character running, or as in my tutorial, the pages of a booking flipping.
2. Rendering an animation where only the camera is moving, like an architectural fly-through. (for a tutorial on this go here: http://www.spot3d.com/vray/help/150SP1/tutorials_imap2.htm)
We are animating something moving (book pages) in this tutorial. If you have ever had to animate the pages of a book turning, you will know that it's a real pain in the arse. Luckily I found this cool maxscript that does it for you , (Bookrigger V2.21 from http://www.ardakutlu.com/scripts.html). Many thanks to Arda for the use of his script! Check out his other scripts, and if you find them useful, give him the respect and thanks he deserves! P.S. You don't need to install this particular maxscript to do the tutorial, but I've included it anyway in case you want to play with it.
Step 1
To follow this tutorial it is advised that you use download the file how_to_render_moving_objects_with_v-ray_tutorial.rar and unpack the contents of this file to your computer. You can get the file here: http://rapidshare.com/files/182051266/how_to_render_moving_objects_with_v-ray_tutorial.rar
OR
here: http://www.turbosquid.com/FullPreview/Index.cfm/ID/437621
(You don't have to do this - If you already have an animated scene that you want to render, you can just read along and apply the same settings to your own scene - it's up to you )
If you downloaded and unpacked the above-mentioned rar file you should now have a folder called how_to_render_moving_objects_with_v-ray_tutorial on your computer.
Good - now go the folder called max models, and open the file called animated_book_start.max
Step 2
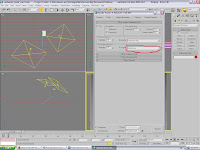
Now because I like to use the Linear Work Flow(LWF), we'll set that up quickly. I'm not going to explain LWF too much, we are just going to do it.
Change 3DS Max's Gamma settings to 2.2 (You can change the Gamma settings in 3DS Max here: Toolbar>Customize>Preferences)
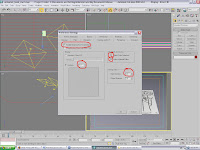
Change the color mapping in your V-Ray settings (Toolbar>Rendering>Render>V-Ray>V-Ray::Color Mapping)
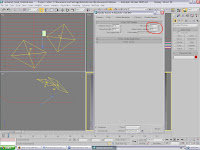
Disable the standard 3DS Max virtual frame buffer (VFB) (Toolbar>Rendering>Render>uncheck the "Rendered Frame Window" check box.
Enable the V-Ray frame buffer (VFB) (Toolbar>Rendering>Render>V-Ray>V-Ray Frame buffer>check the "enable V-Ray Frame Buffer" check box. (I recommend using the V-Ray frame buffer all the time anyway, as it gives you more options for adjusting your renders - exposure, color correction, etc.)
Ok cool, now the LWF is setup, let's move on to the next step.
Step 3
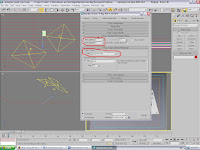
Change the V-Ray Image sampler to Adaptive DMC (Toolbar>Rendering>Render>V-Ray>V-Ray::Image Sampler(Antialiasing>Adaptive DMC in the dropdown). We do this because it's faster than Adaptive subdivision. We'll also leave the min and max subdivs at their defaults of 1 and 4.
Step 4
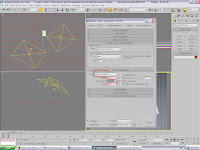
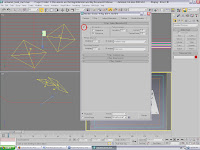
Turn Indirect Illumination (GI) on. (Toolbar>Rendering>Render>Indirect illumination>V-Ray::Indirect illumination (GI)>Turn checkbox on)
Step 5
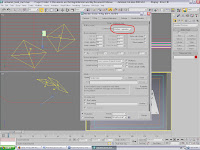
Change the Irradiance map preset to Medium - animation (Toolbar>Rendering>Render>Indirect illumination>V-Ray::Irradiance map >Built-in presets>Medium - animation)
Step 6
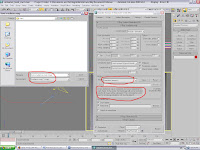
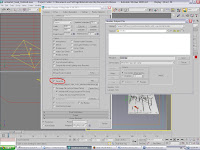
Change the Irradiance map mode to Animation (prepass) (Toolbar>Rendering>Render>Indirect illumination> V-Ray::Irradiance map >Mode> Animation (prepass))
The computer will prompt you to save the file - save it in the folder called maps (how_to_render_moving_objects_with_v-ray_tutorial/maps), and name the file book_irradiance_map.vrmap. Note that this will be a sequence of irradiance map files - one for each frame of the animation.
Step 7
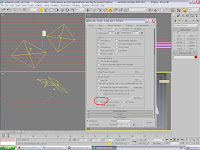
Note too that we leave the secondary GI engine on it' s default (Brute force)
Step 8
Let's increase the V-Ray DMC Sampler settings for better quality (Toolbar>Rendering>Render>Settings> V-Ray::DMC Sampler >Min Samples=16 and Global Subdivs multiplier =2.0
Step 9
Ok - Now click Render. The calculating of the Irradiance maps might take a while, so now id a good time to take a break - go get some coffee, eat some food, go to the toilet, go outside.... GET AWAY FROM THE COMPUTER, TOO MUCH COMPUTER = BAD!
Step 10
Welcome back, were nearly done...we are now going to render out the final animation.
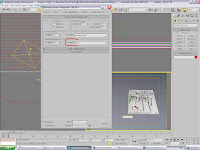
Choose a file format and name for your animation. For simplicities sake I am going to call my file book.jpg and render out a .jpg sequence. You could render out a .mov or a .avi or whatever, but I recommend using a sequence because if your computer "bombs out"/crashes at say, frame 40, you don't have to restart the render from the beginning. You can just start the animation from frame 40 and render till the end. Also, it's better for network rendering(should you want to) and post editing in Adobe After Effects/Combustion/Shake etc.
(Toolbar>Rendering>Render>Common>Render Output >Save File)
Step 11
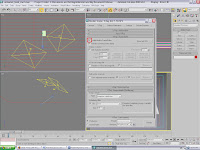
Change the Irradiance map mode to Animation (rendering) and load the Irradiance maps that you rendered out earlier. (Toolbar>Rendering>Render>Indirect illumination> V-Ray::Irradiance map >Mode> Animation (rendering))
The map you must load is the first one in the sequence

Step 12
Change the secondary GI engine to None (You don't need it because the GI has already been calculated in the previous render) (Toolbar>Rendering>Render>Indirect illumination> V-Ray::Indirect Illumination (GI)>Secondary bounces, GI engine dropdown: None)
Step 13
Click Render, take another break.
Step 14
Congratulations - you've completed the tutorial and rendered moving objects with V-Ray! Let's check our animation in the 3ds Max RAM player to see how it looks:
When rendering animations with V-Ray, there are two basic approaches:
1. Rendering an animation where something is moving, like a car, a character running, or as in my tutorial, the pages of a booking flipping.
2. Rendering an animation where only the camera is moving, like an architectural fly-through. (for a tutorial on this go here: http://www.spot3d.com/vray/help/150SP1/tutorials_imap2.htm)
We are animating something moving (book pages) in this tutorial. If you have ever had to animate the pages of a book turning, you will know that it's a real pain in the arse. Luckily I found this cool maxscript that does it for you , (Bookrigger V2.21 from http://www.ardakutlu.com/scripts.html). Many thanks to Arda for the use of his script! Check out his other scripts, and if you find them useful, give him the respect and thanks he deserves! P.S. You don't need to install this particular maxscript to do the tutorial, but I've included it anyway in case you want to play with it.
Step 1
To follow this tutorial it is advised that you use download the file how_to_render_moving_objects_with_v-ray_tutorial.rar and unpack the contents of this file to your computer. You can get the file here: http://rapidshare.com/files/182051266/how_to_render_moving_objects_with_v-ray_tutorial.rar
OR
here: http://www.turbosquid.com/FullPreview/Index.cfm/ID/437621
(You don't have to do this - If you already have an animated scene that you want to render, you can just read along and apply the same settings to your own scene - it's up to you )
If you downloaded and unpacked the above-mentioned rar file you should now have a folder called how_to_render_moving_objects_with_v-ray_tutorial on your computer.
Good - now go the folder called max models, and open the file called animated_book_start.max
Step 2
Now because I like to use the Linear Work Flow(LWF), we'll set that up quickly. I'm not going to explain LWF too much, we are just going to do it.
Change 3DS Max's Gamma settings to 2.2 (You can change the Gamma settings in 3DS Max here: Toolbar>Customize>Preferences)

Change the color mapping in your V-Ray settings (Toolbar>Rendering>Render>V-Ray>V-Ray::Color Mapping)

Disable the standard 3DS Max virtual frame buffer (VFB) (Toolbar>Rendering>Render>uncheck the "Rendered Frame Window" check box.

Enable the V-Ray frame buffer (VFB) (Toolbar>Rendering>Render>V-Ray>V-Ray Frame buffer>check the "enable V-Ray Frame Buffer" check box. (I recommend using the V-Ray frame buffer all the time anyway, as it gives you more options for adjusting your renders - exposure, color correction, etc.)

Ok cool, now the LWF is setup, let's move on to the next step.
Step 3
Change the V-Ray Image sampler to Adaptive DMC (Toolbar>Rendering>Render>V-Ray>V-Ray::Image Sampler(Antialiasing>Adaptive DMC in the dropdown). We do this because it's faster than Adaptive subdivision. We'll also leave the min and max subdivs at their defaults of 1 and 4.

Step 4
Turn Indirect Illumination (GI) on. (Toolbar>Rendering>Render>Indirect illumination>V-Ray::Indirect illumination (GI)>Turn checkbox on)

Step 5
Change the Irradiance map preset to Medium - animation (Toolbar>Rendering>Render>Indirect illumination>V-Ray::Irradiance map >Built-in presets>Medium - animation)

Step 6
Change the Irradiance map mode to Animation (prepass) (Toolbar>Rendering>Render>Indirect illumination> V-Ray::Irradiance map >Mode> Animation (prepass))
The computer will prompt you to save the file - save it in the folder called maps (how_to_render_moving_objects_with_v-ray_tutorial/maps), and name the file book_irradiance_map.vrmap. Note that this will be a sequence of irradiance map files - one for each frame of the animation.

Step 7
Note too that we leave the secondary GI engine on it' s default (Brute force)

Step 8
Let's increase the V-Ray DMC Sampler settings for better quality (Toolbar>Rendering>Render>Settings> V-Ray::DMC Sampler >Min Samples=16 and Global Subdivs multiplier =2.0

Step 9
Ok - Now click Render. The calculating of the Irradiance maps might take a while, so now id a good time to take a break - go get some coffee, eat some food, go to the toilet, go outside.... GET AWAY FROM THE COMPUTER, TOO MUCH COMPUTER = BAD!
Step 10
Welcome back, were nearly done...we are now going to render out the final animation.
Choose a file format and name for your animation. For simplicities sake I am going to call my file book.jpg and render out a .jpg sequence. You could render out a .mov or a .avi or whatever, but I recommend using a sequence because if your computer "bombs out"/crashes at say, frame 40, you don't have to restart the render from the beginning. You can just start the animation from frame 40 and render till the end. Also, it's better for network rendering(should you want to) and post editing in Adobe After Effects/Combustion/Shake etc.
(Toolbar>Rendering>Render>Common>Render Output >Save File)

Step 11
Change the Irradiance map mode to Animation (rendering) and load the Irradiance maps that you rendered out earlier. (Toolbar>Rendering>Render>Indirect illumination> V-Ray::Irradiance map >Mode> Animation (rendering))
The map you must load is the first one in the sequence

Step 12
Change the secondary GI engine to None (You don't need it because the GI has already been calculated in the previous render) (Toolbar>Rendering>Render>Indirect illumination> V-Ray::Indirect Illumination (GI)>Secondary bounces, GI engine dropdown: None)

Step 13
Click Render, take another break.
Step 14
Congratulations - you've completed the tutorial and rendered moving objects with V-Ray! Let's check our animation in the 3ds Max RAM player to see how it looks:
